Wednesday, August 31, 2016

Craft Project Central Day 5

Hi Stampin' Friends!!

Have you seen all the fabulous projects posted at Craft Project Central this month?! So many great projects that you can get step-by-step instructions to.

Here are to more amazing examples:


A Sweet Birthday Ensemble!   Carole Anne Patterson – www.fabric-paper-scissors.com 


This beautiful Birthday Sweet and Cupcake themed ensemble is for that special girl or woman in your life.  It's for six guests but you could make more! All using beautiful designer series paper and cardstock. The die cut and embossed Happy Birthday Banner is adorable and can be used year after year. Sweet and simple invitations have a raised cupcake plus envelopes. The birthday card has a glimmer filled clear shaker underneath the cupcake.  There's a Thank You Note Book to record gifts, the year and important information about the birthday. Can't forget the tiny Goody Bags and lastly, six simple Thank You Cards finish this ensemble. 


Shake it Up! – August Bonus Project*   Sue Plote – www.thispinkrooster.blogspot.com 


Who doesn't love a shaker card...or a shaker tag!  This project includes instructions for three ways to create simple shaker cards...and matching shaker tags!   Featuring the Designer Tin of Cards Stamp Set and colorful papers, this project uses sequins and punches...for sparkle and color...to create fun, interactive cards and tags that everyone is sure to love!

Make sure you visit all these talented stamper's blogs and see all their amazing creations.

Thanks for stopping by!
Happy Stamping!!
Krystal

Tuesday, August 30, 2016

Stampin' Up! Thoughtful Branches Pumpkin

Hi Stampin' Friends!!

Have you purchased the Thoughtful Branches stamp set and matching Beautiful Branches Framelits yet? You better hurry!! They are both a LIMITED EDITION and only available until tomorrow!!!

Here is a fun card I sent to my July Online Card Class members:


Stamps: Thoughtful Branches
Paper: Wild Wasabi, Crumb Cake, Pumpkin Pie, Whisper White
Accessories: Beautiful Branches Framelits, Circle Punch, Woodland EF, Burlap Ribbon

I've seen a few Thoughtful "pumpkin" cards. This is my take on it. I used the "tree trunk" stamp from the set as the stem on the pumpkin. I layered two "pumpkins" on top of each other using Dimensionals to give it some added depth. I like how it turned out!!

Remember... You must order this set ASAP!!!! Get it before it's GONE FOREVER!!!


Thanks for stopping by!!
Happy Stamping!
Krystal


Monday, August 29, 2016

Craft Project Central Day 4

Hi Stampin' Friends!!

More fun peeks from our friends at Craft Project Central!!

Lightning Bug Lantern Gift Set!   Amanda Corbet – www.kraftingkreations.com 


Light up your nights and hang on to summer a little bit longer with this shiny silver lantern. Add a battery powered tea light inside and it will remind you of seeing fireflies twinkling in the evening in summertime. You can hang the lantern for display from the attached ribbon so it can grace either your table or your walls. Bring a smile to someone's face by gifting this beautiful lantern with the matching card and a set of note cards. This would be an excellent class project or hostess gift!


Colorful Fiesta Quilt Designs– Regina Andari –  www.workinouttheinks.blogspot.com 


Quilting is a popular craft and one that affords great opportunity to put vibrant colors and shapes to work.  With this tutorial, use a couple of quilting techniques and designer paper to create four festive birthday cards.  You'll also learn how to use one punch and the Festive Birthday Designer Series Paper to create a bright and colorful home décor canvas that is sure to add a little happiness to any room where it's placed.

Don't these look adorable?! Go check them out and give these fabulous designers some blog love.

Thanks for stopping by!
Happy Stamping!
Krystal

Sunday, August 28, 2016

Craft Project Central Day 3

Hi Stampin' Friends!!

Have you gone and checked out Craft Project Central yet?! Go do it!! Right now!!

They have a great subscription program where you get TONS of fabulous Stampin' Up! PDF instruction files that you can download and keep forever. And the best part is they have awesome designers every month!!!

Here are a couple more from the month of August:

Ahoy There! Note Card & Gift Box! – Mickey Roberts – www.paperconversation.typepad.com 


The By the Shore Suite uses colors and images that evoke cool ocean water and gentle summer breezes.  Come take a swim with the colorful fish in the Seaside Shore Stamp Set and relax with the soothing colors of the By the Shore Designer Series Paper.  It's vacation time, Stampin' Up! style.


Traveler Travel Log Gift Set!   Michelle Wecksler – www.myfigments.blogspot.com


A place to record memories and moments from your trip.  A place for a special friend to make quick sketches of sites and significant finds.  This Traveler Travel Log Gift Set is a perfect gift for yourself or for any explorer with the travel bug! In this project you will learn how to create a faux alligator finish using embossing powder and your bone folder.  You will also learn how to make a mini travel log with simple hand-sewn signatures. This gift set includes a mini travel log and a unique "suitcase" to hold the travel log.

Happy Stamping!
Krystal

Saturday, August 27, 2016

Stampin' Up! Jar of Love Lemonade

Hi Stampin' Friends!!

Today is the final card from my Jar of Love online card class.


Stamps: Jar of Love
Paper: Whisper White, Flirty Flamingo, Fruit Stand DSP, Vellum
Ink: Basic Gray, Flirty Flamingo
Accessories: Everyday Jars Framelits, Triple Banner Punch, Festive EF, Flirty Flamingo ribbon, straw


Kit Includes:

1 - Whisper White card base
1 - Flirty Flamingo embossed card front
1 - Fruit Stand DSP strip
1 - Fruit Stand DSP lemon piece
1 - Fruit Stand DSP lemon strip
1 - Vellum piece
1 - Flirty Flamingo ribbon
1 - straw


Instructions:

Attach the Flirty Flamingo card front to the Whisper White card base.
Attach the Fruit Stand DSP strip to the left side of the card front.
Stamp the large jar onto the vellum piece using Archival Basic Gray ink. Be careful to let the ink completely dry before cutting it out so that it does not smear.
Using your Everyday Jars Framelits, cut out a large jar from the lemon DSP. Trim the top off so it is lower than the lid area.
Attach the vellum jar onto the lemon jar using Glue Dots around the bottom and edges only. Leave the top open.
Wrap your straw with the Flirty Flamingo ribbon. Double sided tape or lots of Glue Dots works best.
Place straw inside jar. I did not attach my straw. 
Attach lemonade jar to card front using Dimensionals. The straw is kind of thick so I layered two Dimensionals on top of each other under my jar to give some extra height.
Cut out a lemon piece from the Fruit Stand lemon strip to use on the side of your jar. If you have a Wink of Stella Glitter Pen, add a little sparkle to your lemon wedge. Cut a slit in your lemon and attach it to the side of the jar with a Glue Dot.
Stamp your sentiment on a tag using Flirty Flamingo or any coordinating color ink. GLue to the front of the card

I saw this idea on Pinterest and thought it was just so cute!! I love how it turned out.

I hope you had fun making your cards!!

In the next couple of days I will be sharing more sneak peeks from the Craft Project Central blog.

Come back and visit again soon!

Happy Stamping!
Krystal!!

Friday, August 26, 2016

Stampin' Up! Jar of Love Fruit Stand

Hi Stampin' Friends!!

Here is another card I CASEd and then created for my Jar of Love online card class:


Stamps: Jar of Love
Paper: Whisper White, Fruit Stand DSP, retired DSP
Ink: Real Red, Daffodil Delight, Basic Black
Accessories: Everyday Jars Framelits, red ribbon retired, Dimensionals


Kit Includes:

1 - Whisper White card base
1 - Crumb Cake embossed DSP (retired) card front
1 - Real Red polka dot DSP (retired) strip
3 - Fruit Stand DSP pieces
1 - Whisper White piece for stamping
1 - Real Red ribbon (retired)


Instructions:

Attach the Crumb Cake card front onto the Whisper White card base.
Attach Real Red polka dot strip to bottom of Crumb Cake DSP.
Stamp the large jar onto the pear Fruit Stand DSP using Basic Black ink. Stamp the "strings".
Stamp the medium jar onto the strawberry Fruit Stand DSP using Basic Black ink.
Stamp the small jar onto the lemon Fruit Stand DSP using Basic Black ink.
If you have extra fruit pieces, cut them out and glue them to the front of the jars. That's how my jars look like they have more fruit in them.
Using Real Red ink, stamp three jar lids. 
Using Daffodil Delight ink to stamp the ribbon.
Cut out all the pieces using the Everyday Jars Framelits.
Glue lids onto jars using Liquid Glue.
Glue pear jar and lemon jar onto front of card, leaving a space between the two. 
Add the strawberry jar using Dimensionals.
Stamp any sentiment onto a tag.
Add tag and "ribbon" to the strawberry jar.
Tie Real Red ribbon around the side.

And you have another Jar of Love cad to share with friends!!

Today is the LAST DAY to join my Foxy Friends August online card class:


Joining my class is super easy!!

1. Go to my Stampin' Up! website: Krystal's Cards

2. Order the Foxy Friends Bundle #142326 found on page 57 of the Stampin' Up! catalog. The bundle includes the Foxy Friends stamp set and the matching Fox Builder Punch.

3. Use Hostess Code: VEHY9R4Y
THIS IS THE NUMERO UNO, MOST IMPORTANT STEP!!!

4. Wait very patiently for me to send you a card kit that contains all the supplies needed to create 4 adorable cards using your new Foxy Friends stamp set and Fox Builder punch.

(FYI... I'm a wife, mom, employer and now a student. I'm a little slower getting my card kits out than I have been in the past. But I promise it's worth the wait!!!)

5. Visit my blog for step-by-step instructions on how to create the cards.

See!!! Super easy!!!

Stop by tomorrow for my final Jar of Love card!!!

Happy Stamping!
Krystal

Thursday, August 25, 2016

Stampin' Up! Jar of Love Friend

Hi Stampin' Friends!!

Today I'm going to share the second card from my Jar of Love card kit. I hope you enjoy!!


Supplies:
Stamps: Jar of Love, Hardwood Background 
Paper: Bermuda Bay, Whisper White, Crumb Cake, Smoky Slate
Ink: Bermuda Bay, Smoky Slate, Crumb Cake, Wild Wasabi, Pumpkin Pie, Peekaboo Peach
Accessories: Everyday Jars Framelits, Doily, Peekaboo Peach ribbon, Dimensionals


Kit Includes:
1 - Bermuda Bay card base
1 - Whisper White card front
1 - Whisper White piece for stamping
1 - Crumb Cake strip
1 - Smoky Slate strip
1 - Bermuda Bay piece
1 - half Doily
1 - Peekaboo Peach Ribbon


Instructions:
Attach Whisper White card front onto Bermuda Bay card base.
Trim the doily to fit on the Crumb Cake strip.
If you have the Hardwood Background stamp, then stamp the Crumb Cake strip with Crumb Cake ink. If you don't have the Hardwood stamp (and why don't you?!) you could also emboss the piece with the Woodgrain embossing folder. If you do not have either, just leave it plain. Attach Crumb Cake strip to the bottom of the Whisper White card front.
Attach Doily to the Crumb Cake strip.
Stamp the large jar image using Bermuda Bay ink (you could use Basic Black ink if you do not have Bermuda Bay) onto the Bermuda Bay piece. Cut out using the coordinating Framelit.
Stamp the "Friend" sentiment using Bermuda Bay ink onto the front of your jar.
Stamp the jar lid image using Smoky Slate ink onto the Smoky Slate piece. Cut out using coordinating Frameit. Attach to the top of the jar using Liquid Glue.
Position your jar where you want it on the center of the card front. DO NOT ATTACH THE JAR YET!! Lightly draw a pencil mark at the top of the jar onto the Whisper White piece. This will give you a reference for when you stamp the stems.
Using WIld Wasabi ink (or any other shade of green ink you have), stamp multiple stems at various levels onto the Whisper White card front.
Attach your jar using Dimensionals.
Stamp your flowers. First use Peekaboo Peach ink for the lighter color. Then stamp Pumpkin Pie for the darker color. Cut out flowers using coordinating Framelits.
Attach flowers using Dimensionals.
Tie Peekaboo Peach ribbon around the top of the card.

And now you are finished with card number two!!

Here was my inspiration for this card:


My mom bought me this antique mason jar at a thrift store. I store my big Stampin' Up! buttons in it. Notice how the word "Ball" is slanted upward? I've seen many people try to stamp the "jar" sentiments straight. It's not supposed to be straight. And I'm not going to lie, it bugs me when I see it stamped straight. A little OCD much? :)


Tomorrow will be the LAST DAY to join my Foxy Friends Card Class:


Joining my class is super easy!!

1. Go to my Stampin' Up! website: Krystal's Cards

2. Order the Foxy Friends Bundle #142326 found on page 57 of the Stampin' Up! catalog. The bundle includes the Foxy Friends stamp set and the matching Fox Builder Punch.

3. Use Hostess Code: VEHY9R4Y
THIS IS THE NUMERO UNO, MOST IMPORTANT STEP!!!

4. Wait very patiently for me to send you a card kit that contains all the supplies needed to create 4 adorable cards using your new Foxy Friends stamp set and Fox Builder punch.

(FYI... I'm a wife, mom, employer and now a student. I'm a little slower getting my card kits out than I have been in the past. But I promise it's worth the wait!!!)

5. Visit my blog for step-by-step instructions on how to create the cards.

See!!! Super easy!!!

Stop by again tomorrow and see the third card in my Jar of Love card kit.
Happy Stamping!!
Krystal

Wednesday, August 24, 2016

Stampin' Up! Jar of Love Firelfies

Hi Stampin' Friends!!
I finally mailed my Jar of Love card kits so I can share my cards now!! I love this darling set and had a difficult time choosing exactly which cards to create since there were so many adorable options on the interwebs. I poked around and combined a few designs, so some of them may look familiar to others you've seen on my Pinterest board.

Here is the first card:


Supplies:
Stamps: Jar of Love
Paper: Elegant Eggplant, Wisteria Wonder, Smoky Slate, Whisper White
Ink: Basic Black, Smoky Slate, Wild Wasabi, Wisteria Wonder
Accessories: Everyday Jars Framelits, Lucky Stars Embossing Folder, Silver Ribbon, Daffodil Delight Marker, Wink of Stella Glitter Brush, Stampin' Sponge


Kit Includes: 
1 - Elegant Eggplant card base
1 - Wisteria Wonder embossed card front
1 - Whisper White piece for stamping
1 - Smoky Slate large strip
1 - Smoky Slate small piece
1 - Whisper White strip
1 - Smoky Slate Ribbon


Instructions:
Using Wisteria Wonder ink (or any other shade of purple ink you have), sponge the top edge of the Wisteria Wonder embossed card base. This is to give the appearance of the sky getting darker. Do the same to the longer Smoky Slate strip.
Attach the Wisteria Wonder card front onto the Elegant Eggplant card base.
Using Basic Black ink, stamp the medium sized jar onto the larger Smoky Slate strip.
Using Wild Wasabi ink (or any other shade of green ink you have), stamp the "grass" around the jar. It is the image of a stem with leaves.
Attach the larger Smoky Slate strip that you stamped on, onto the Wisteria Wonder card front.
Using Smoky Slate ink (or any shade of gray ink you have), stamp the jar lid image onto the smaller Smoky Slate piece.. Cut out using coordinating Framelit. Attach near your stamped jar image using Dimensionals.
Using Basic Black ink, stamp seven fireflies onto the Whisper White cardstock. Cut out using coordinating Framelit.
Color body of fireflies with the Daffodil Delight marker or any other shade of yellow marker you have. If you have the Wink of Stella Glitter Pen, glitter up the wings of the fireflies. Attach fireflies "inside" the jar using Liquid Glue so they are flush with the jar. Attach the "escaped" fireflies using Dimensionals so they look like they are flying.
Stamp a sentiment onto the Whisepr White piece. Notch the edge if you would like. Attach to left side using Dimensionals.
Attach Smoky Slate Ribbon.


Yay!! Your first card is finished!!

Only a few days left to join my Foxy Friends class!!


Joining my class is super easy!!

1. Go to my Stampin' Up! website: Krystal's Cards

2. Order the Foxy Friends Bundle #142326 found on page 57 of the Stampin' Up! catalog. The bundle includes the Foxy Friends stamp set and the matching Fox Builder Punch.

3. Use Hostess Code: VEHY9R4Y
THIS IS THE NUMERO UNO, MOST IMPORTANT STEP!!!

4. Wait very patiently for me to send you a card kit that contains all the supplies needed to create 4 adorable cards using your new Foxy Friends stamp set and Fox Builder punch.

(FYI... I'm a wife, mom, employer and now a student. I'm a little slower getting my card kits out than I have been in the past. But I promise it's worth the wait!!!)

5. Visit my blog for step-by-step instructions on how to create the cards.

See!!! Super easy!!!

Make sure to stop back by tomorrow for your second card.
Happy Stamping!!
Krystal

Monday, August 22, 2016

Craft Project Central Day 2

Hi Stampin' Friends!!

I've got more fabulous sneak peek projects to share from the amazing designers over at Craft Project Central!!

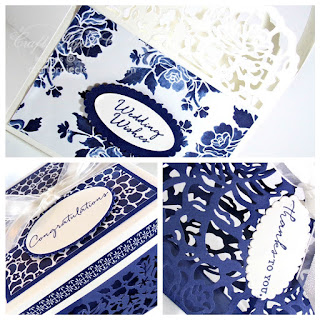
Elegant Floral Gift Packaging Trio! – Christy Fulk – www.createwithchristy.blogspot.com – 

Do you need an elegant gift packaging idea for a wedding or another special event? These gift packaging projects are just what you need. This tutorial includes a 4-1/4" square gift box, gift bag, and a treat pouch. The square box is perfect for gifts 4" or smaller, the gift bag is a perfect way to make a card/gift card extra special, and the treat pouch would be a perfect way to give treats to wedding guests. All three packages feature the products in the Floral Boutique Suite. This would also make a great product-based class. 


Fancy Flamingo Gift Set!  – Buffy Cooper –  www.buffycooper.wordpress.com 


As summer is ending, you'll want to have a gift for the relatives and friends you've visited. This flamingo tray and pineapple treat box will be a perfect "thank you" gift. If you're the one hosting family and friends, it's a wonderful "pillow gift" for guests. Simply package some chocolates in the Clear Tiny Treat Boxes and add some basic toiletries on the tray with a welcoming note card. You can also make this for yourself as a beautiful home décor piece. Create multiple personalized note cards for your own use or make them as a gift for a friend. This project will also make a great class or stamp camp.

I'l be sharing more soon. Stay tuned!

Thanks for stopping by!
Happy Stamping!
Krystal

Friday, August 19, 2016

Craft Project Central Day 1

HI Stampin' Friends!!!

I'm a guest designer over at Craft Project Central this month and I wanted to share some sneak peeks of the other fabulous projects that are on the blog during the month of August. 

Back to School Desk Accessory Gift Set!  – Julie Beltramo – www.justjulieb30.blogspot.com 


Get ready to go back to school with this fun gift set! The Covered Notepad Portfolio packs a real punch with a surprise pocket on the inside cover. It's simple to make, but has a very finished look inside and out! You'll have the measurements to make twelve simple Note Cards, great for sending off those quick little thoughtful messages. After bundling and tying up some pencils, you'll have all the components to fill the Desktop Accessory Box. The fabulous Desktop Accessory Box is a compact and practical way to organize this gift! 

Beach Vignette Ensemble! –  Julie Warnick – www.juliew.stampinup.net  


Summer is coming to an end, but you can enjoy the beach all year long with this Beach Vignette Ensemble! The Framed Beach Sign takes center stage in this fun ensemble with bottles and shells surrounding it. You can leave the bottles plain or decorate them with jute to give them a beachy vibe. Turn plain glass votive holders into sea glass votive holders with simple supplies and an easy trick! And don't forget a matching card in case you want to give this set away to someone who needs a little more summer! 

Thanks for stopping by!
Happy Stamping!
Krystal