Well today is another "how-to" post. This technique is called Faux Marble or the shaving cream technique. I showed you this card last week:
I took some "how-to" photos while I tested out this technique. I would have never done this technique myself, except I was challenged to over at my favorite online Stampin' Up! hangout, STAMPIN' ADDICTS. They have different challenges posted each day of the week, and Tuesday is technique day. I actually made two cards with this technique, since you can get two prints out of the shaving cream, before it turns into a big colorful mess. Here's the second card I made, using the same colors and layout:
And here's the "how-to" photo (I know, I'm so old school, but video ain't happenin'!) tutorial:
Gather your supplies:
SU! Glossy Cardstock
SU! Reinkers
Shaving Cream
Pan
Skewer
Paper Towels
Spray shaving cream into your pan. At least an inch thick. I may have gone a little overboard. You know what they say... if a little is good, alot is even better! :)
Smooth out your shaving cream. I just used a scrap of cardstock to smooth it.
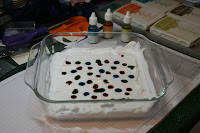
Drop ink onto the shaving cream. Again, not sure if you need this much. You'd probably get a totally different look if you used less ink.
Using the skewer, swirl your ink around. Again, I think I may have swirled a little too much, as the colors started to get kind of muddied. I kept thinking that the entire shaving cream surface needed to be covered in ink, but I think some white shaving cream showing would have been just fine.
Once you have the desired look, press your glossy cardstock onto the shaving cream surface.
Your cardstock will look kind of yucky at this point. I thought I had ruined it for sure!
Now use your paper towels to dab off the excess shaving cream. Be sure that you do not rub it off, as you will only smear your ink and loose the marble effect. Just dabbing up and down will work. You may use quite a few paper towels for this step.
And here is the finished product, ready for you to use on your creation! I will definitely try this technique again. I plan to experiment a little more with different colors of reinkers.
Again, here are the two cards I made:
On the Trendy Trees card, you may notice some dots amongst all that swirl. I thought it would be fun to first emboss the Glossy Cardstock with the Polka Dot background stamp. I just used Versamark ink and Clear Embossing Powder. Its fun to see how two cards using the same layout and colors can look so different.
Yesterday I forgot to post what I was thankful for, since it is Thanksgiving week here in the U.S.. So today I get to say two things... I am so grateful for my wonderful hubby (yea I am blinded by your awesomeness and attractiveness!) and my three fabulous kids. My life would be incomplete without them. Each of their unique qualities makes our family what it is. I am so thankful that God has given me the gift of being your wife and mom.
Thanks for stopping by!
Happy Stamping!


1 comment:
Very cool, Krystal! Love your bold colors. I've done this tech before, but with light (apparently boring) colors. Gotta try it again and go darker! TFS!
Post a Comment